


Table of contents
- How did I get to know about OpenCV and mediapipe?
- What are the uses of mediapipe and OpenCV?
- Thank you for watching my blog. If you like this type of blog you can follow me on hashnode

How did I get to know about OpenCV and mediapipe?
Hey! I'm Harsh pursuing Computer Engineering. One day I saw one of my LinkedIn friend building a project on machine learning, and I found myself curious about machine learning. so I started the search project on machine learning then I got to know about OpenCV and mediapipe.
What are the uses of mediapipe and OpenCV?
Here are some uses of OpenCV
Face recognition.
Automated inspection and surveillance.
Many people – count.
Vehicle counting on highways along with their speeds.


Here are some uses of Mediapipe
Face detection
Face Mesh
Hands Detection
Iris Detection

How can I find the project?
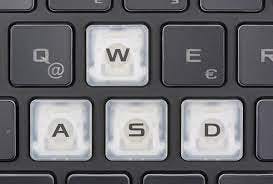
To find the project you can refer to my GitHub profile, about how to play the WASD game using hand detection.
Follow meif you like my Project
Introduction about Game
In this project, you can play any game that uses the WASD key for playing.
For moving character or car:
W --> Moving up or forward
S --> Moving down or backward
A --> Moving side or right
D --> Moving side or left
Project Structure
In the project, I'm using OpenCV for reading videos to use the Mediapipe library to detect hand in videos. I'm using direct_key to construct moves in-game. this can be done by pyWin32 to understand more about pyWin32 stay till last.
Let's discuss OpenCV
What is OpenCV?
OpenCV is an open-source library that includes several hundreds of computer vision algorithms. The document describes the so-called OpenCV 2.x API.penCV has a modular structure, which means that the package includes several shared or static libraries.
For further information here is documentation on OpenCV.
How to install OpenCV on a local Computer?
Before installing OpenCV on your local computer, you need to check if you have python on your computer. To check use this code in your terminal.
python --version
And also check the pip version. To check use this code in your terminal.
pip --version
After this, you can download OpenCV
Here is some step :
Check
pythonandpipthe versionpython --version pip --versionNow you can install OpenCV
pip install opencv-pythonTo check OpenCV
version
python
import cv2
print(cv2.__version__)
Now OpenCV is installed on a local computer.
Let's discuss Mediapipe
What is Mediapipe?
MediaPipe is a cross-platform pipeline framework to build custom machine-learning solutions for live and streaming media. The framework was open-sourced by Google and is currently in the alpha stage.
Read more at Mediapipe.
How to install Mediapipe on a local Computer?
Before installing Mediapipe on your local computer, you need to check if you have python on your computer. To check use this code in your terminal.
After this, you can download OpenCV
You need to install python 3.7+ and x64 version to install
mediapipe
Now you can install Mediapipe
pip install mediapipe
Now let's discuss IDE v/s Code Editor
| IDE | Code Editor |
| An IDE is a set of software development tools defined to make coding easier. | The code editor is a developer's tool designed to edit the source code of a computer program. |
| It consolidates many of the functions like code creation, building, and testing, together in a single framework service or application. | It is a text editor with powerful built-in features and specialized functionalities to simplify and accelerate the code editing process. |
| Key features include text editing, compiling debugging, GUI, syntax highlighting, unit testing, code completion, and more. | Key features include syntax highlighting printing, multiview, and preview window. |
| Some popular IDEs are IntelliJ IDEA,PyCharm, etc. | Some popular Code editors are VS Code, Atom, etc. |
Main Code Structure
- We are importing OpenCV and Mediapipe
import cv2
import mediapipe as mp
import time
from directkey import ReleaseKey, PressKey, W, A, S, D
move_forward=W
move_backwad=S
move_right=D
move_left=A
Using cv2.VideoCapture(0) we are capturing videos
Using mp.solutions.drawing_utils to drawing utils of solution
Using mp.solutions.hands to draw a solution of hand for detection
video = cv2.VideoCapture(0)
mp_create=mp.solutions.drawing_utils
mp_driving_hand=mp.solutions.hands
Using mp_driving_hand.Hands use to min_detection_confidence=0.5 and min_tracking_confidence=0.5.
min_detection_confidence for the detection to be considered successful. Default to 0.5
min_tracking_confidence=0.5 the hand landmarks to be considered tracked successfully, or otherwise, hand detection will be invoked automatically on the next input image
with mp_driving_hand.Hands(min_detection_confidence=0.5,min_tracking_confidence=0.5) as hands:
    while True:
        kloop, image = video.read()
        # Hands take rgb color only and cv make image bgr
        image=cv2.cvtColor(image,cv2.COLOR_BGR2RGB)
        # flags.writeable=False -->> when arr is immutable
        image.flags.writeable=False
        hand_result=hands.process(image)
        image.flags.writeable = True
        # again convert rgb into brg for
        image=cv2.cvtColor(image,cv2.COLOR_RGB2BGR)
        lm_list=[]
image is used to read videos
image=cv2.cvtColor(image,cv2.COLOR_BGR2RGB) is used to convert BGR to RGB
image=cv2.cvtColor(image,cv2.COLOR_RGB2BGR) is used to convert RGB to BGR
lm_list=[] to take co-ordinate of hands.
if you want to learn more about hand detection you can refer to this Mediapipe Documentation
 # marking hand_landmark using mediapipe
        if hand_result.multi_hand_landmarks:
            for hand_landmark in hand_result.multi_hand_landmarks:
                my_hand=hand_result.multi_hand_landmarks[0]
                # marking co-ordinate of points id-->points of hands & lm--> co-ordinate
                for id, lm in enumerate(my_hand.landmark):
                    # h,w,c height and width of image
                    hig, wid, c = image.shape
                    cord_x,cord_y=int(lm.x*wid),int(lm.y*hig)
                    lm_list.append([id,cord_x,cord_y])
                mp_create.draw_landmarks(image,hand_landmark,mp_driving_hand.HAND_CONNECTIONS)
hand_result.multi_hand_landmarks Collection of detected/tracked hands, where each hand is represented as a list of 21 hand landmarks, and each landmark is composed of x, y and z. These 21 landmarks: from 0 to 20.

hig, wid, c = image.shape height, width, and depth of an image
cord_x,cord_y=int(lm.x*wid),int(lm.y*hig) use to find the coordinates of each node from 0 to 20.
lm_list.append([id,cord_x,cord_y]) append coordinates in a list
Let's discuss directkey
as we import directkey upper(We are importing OpenCV and Mediapipe).
To connect hand detection with WASD we use pywin32. Pywin32 is an extension, which provides access to many of the Windows APIs from Python.
import ctypes
import time

SendInput = ctypes.windll.user32.SendInput


W = 0x11
A = 0x1E
S = 0x1F
D = 0x20

# C struct redefinitions
PUL = ctypes.POINTER(ctypes.c_ulong)
class KeyBdInput(ctypes.Structure):
    _fields_ = [("wVk", ctypes.c_ushort),
                ("wScan", ctypes.c_ushort),
                ("dwFlags", ctypes.c_ulong),
                ("time", ctypes.c_ulong),
                ("dwExtraInfo", PUL)]

class HardwareInput(ctypes.Structure):
    _fields_ = [("uMsg", ctypes.c_ulong),
                ("wParamL", ctypes.c_short),
                ("wParamH", ctypes.c_ushort)]

class MouseInput(ctypes.Structure):
    _fields_ = [("dx", ctypes.c_long),
                ("dy", ctypes.c_long),
                ("mouseData", ctypes.c_ulong),
                ("dwFlags", ctypes.c_ulong),
                ("time",ctypes.c_ulong),
                ("dwExtraInfo", PUL)]

class Input_I(ctypes.Union):
    _fields_ = [("ki", KeyBdInput),
                 ("mi", MouseInput),
                 ("hi", HardwareInput)]

class Input(ctypes.Structure):
    _fields_ = [("type", ctypes.c_ulong),
                ("ii", Input_I)]

# Actuals Functions

def PressKey(hexKeyCode):
    extra = ctypes.c_ulong(0)
    ii_ = Input_I()
    ii_.ki = KeyBdInput( 0, hexKeyCode, 0x0008, 0, ctypes.pointer(extra) )
    x = Input( ctypes.c_ulong(1), ii_ )
    ctypes.windll.user32.SendInput(1, ctypes.pointer(x), ctypes.sizeof(x))

def ReleaseKey(hexKeyCode):
    extra = ctypes.c_ulong(0)
    ii_ = Input_I()
    ii_.ki = KeyBdInput( 0, hexKeyCode, 0x0008 | 0x0002, 0, ctypes.pointer(extra) )
    x = Input( ctypes.c_ulong(1), ii_ )
    ctypes.windll.user32.SendInput(1, ctypes.pointer(x), ctypes.sizeof(x))

if __name__ == '__main__':
    time.sleep(10)
    PressKey(0x11)
    time.sleep(10)
    ReleaseKey(0x11)
    time.sleep(1)
This library aims to replicate the functionality of the PyAutoGUI mouse and keyboard inputs, but by utilizing DirectInput scan codes and the more modern SendInput() win32 function. As we define the W A S D key using hexcode. to take input from the user by hand.
We use PressKey it to press input from users and ReleaseKey release the key from the user.
 if len(lm_list)!=0:
            # RIGHT HAND
            if lm_list[5][1]<lm_list[17][1]:
                if lm_list[8][2] > lm_list[6][2] and lm_list[12][2] > lm_list[9][2] and lm_list[16][2] > lm_list[13][2] and lm_list[20][2] > lm_list[17][2]:
                    # To move backward by using pywin32
                    PressKey(S)
                    time.sleep((.08))
                    ReleaseKey(S)
                else:
                    # To move forward by using pywin32
                    PressKey(W)
                    time.sleep((.08))
                    ReleaseKey(W)
            # LEFT HAND
            else:
                if lm_list[2][1]>lm_list[4][1] :
                    # To move left by using pywin32
                    PressKey(D)
                    time.sleep((.08))
                    ReleaseKey(D)
                elif lm_list[2][1]<lm_list[4][1]:
                    # To move right by using pywin32
                    PressKey(A)
                    time.sleep((.08))
                    ReleaseKey(A)
To find Right Hand we use
if lm_list[5][1]<lm_list[17][1]:
                if lm_list[8][2] > lm_list[6][2] and lm_list[12][2] > lm_list[9][2] and lm_list[16][2] > lm_list[13][2] and lm_list[20][2] > lm_list[17][2]: #right hand
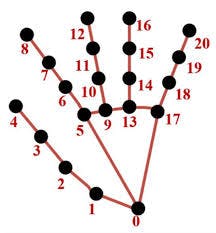
As you can from the above image lm_list[5][1]<lm_list[17][1] [5][1]--> index bottom point and [17][1]-->piny bottom by this we can find right hand and left hand. if this condition is True we can find the right hand.
if lm_list[8][2] > lm_list[6][2] and lm_list[12][2] > lm_list[9][2] and lm_list[16][2] > lm_list[13][2] and lm_list[20][2] > lm_list[17][2]: # right hand open or close
if lm_list[8][2] > lm_list[6][2] and lm_list[12][2] > lm_list[9][2] and lm_list[16][2] > lm_list[13][2] and lm_list[20][2] > lm_list[17][2]: In this code, we are finding hand is open or close. if this code run True the hand is close.
# To move backward by using pywin32
PressKey(S)
time.sleep((.08))
ReleaseKey(S)
then we are calling PressKey to move Character or cars backward. and ReleaseKey afterward.
else:
                    # To move forward by using pywin32
                    PressKey(W)
                    time.sleep((.08))
                    ReleaseKey(W)
Else we are calling PressKey to move Character or cars forward. and ReleaseKey afterward.
To find Left Hand we use the Else statement
if lm_list[2][1]>lm_list[4][1]: #left-hand thumb.
if lm_list[2][1]>lm_list[4][1]: In this code, we are finding the left-hand thumb. if this code runs True then we found the left-hand thumb.
# To move right side by using pywin32
PressKey(D)
time.sleep((.08))
ReleaseKey(D)
then we are calling PressKey to move Character or cars Right side. and ReleaseKey afterward.
elif lm_list[2][1]<lm_list[4][1]: #left-hand index finger
lm_list[2][1]<lm_list[4][1]: In this code, we are finding the left-hand index finger. if this code runs True then we found the left-hand index finger.
then we are calling PressKey to move Character or cars Left side. and ReleaseKey afterward.
# To move left side by using pywin32
PressKey(A)
time.sleep((.08))
ReleaseKey(A)
cv2.imshow("frame", image)
        # ending_game to kill the terminand
        ending_game = cv2.waitKey(1)
        if ending_game == ord('e'):
            break
    video.release()
    cv2.destroyAllWindows
we use cv2.imshow to show the image(output)